Creating a Facebook Page is a powerful way to establish your brand, engage with your audience, and grow your business or personal brand online. With over 2 billion active users, Facebook offers a vast platform to reach new customers, showcase your products or services, and build a community around your brand. Setting up a Facebook Page involves more than just creating a profile; it requires thoughtful configuration to make it a professional and user-friendly destination.
This step-by-step guide will walk you through the entire process of setting up your Facebook Page—from creating an account and adding your profile details to customizing the layout, activating messaging features, and setting up essential roles. Whether you’re new to social media or looking to optimize your online presence, following these steps will ensure your Facebook Page is ready to attract and engage your target audience effectively.
What is a Facebook Page?
A Facebook Page is a public profile specifically created for businesses, organizations, brands, artists, or public figures to connect with fans, customers, and potential clients. Unlike personal profiles, which are meant for individual use, Facebook Pages allow businesses and influencers to share updates, promote products or services, interact with followers, and manage a brand’s online presence. Pages come with unique features like insights, ad creation, customizable tabs, and automated messaging, which are tailored to help organizations grow and reach a larger audience.
Why Do We Need a Facebook Page?
A Facebook Page is essential for several reasons:
- Builds Brand Identity and Credibility: A Facebook Page acts as a digital storefront, showcasing your brand’s offerings, personality, and values. This helps establish credibility and allows people to trust and recognize your brand.
- Reach a Broader Audience: Facebook Pages can be followed by anyone, regardless of whether they have a personal connection to you, making it easier to grow a fan base that extends beyond your personal network.
- Cost-Effective Marketing: A Facebook Page provides a free platform to share content, engage followers, and promote products. Paid advertising options are also available, allowing you to reach targeted demographics and grow your brand more efficiently than traditional advertising.
- Engage and Interact with Customers: Pages enable two-way communication, allowing you to respond to comments, answer questions, and build relationships with your audience in real time.
- Boosts Search Engine Visibility: Facebook Pages are indexed by search engines like Google, which helps improve your brand’s visibility when people search for related products or services online.
- Provides Useful Analytics: Pages come with Facebook Insights, which offer valuable data on your audience’s demographics, engagement, and interaction with your content. This data can guide your content strategy and improve your marketing efforts.
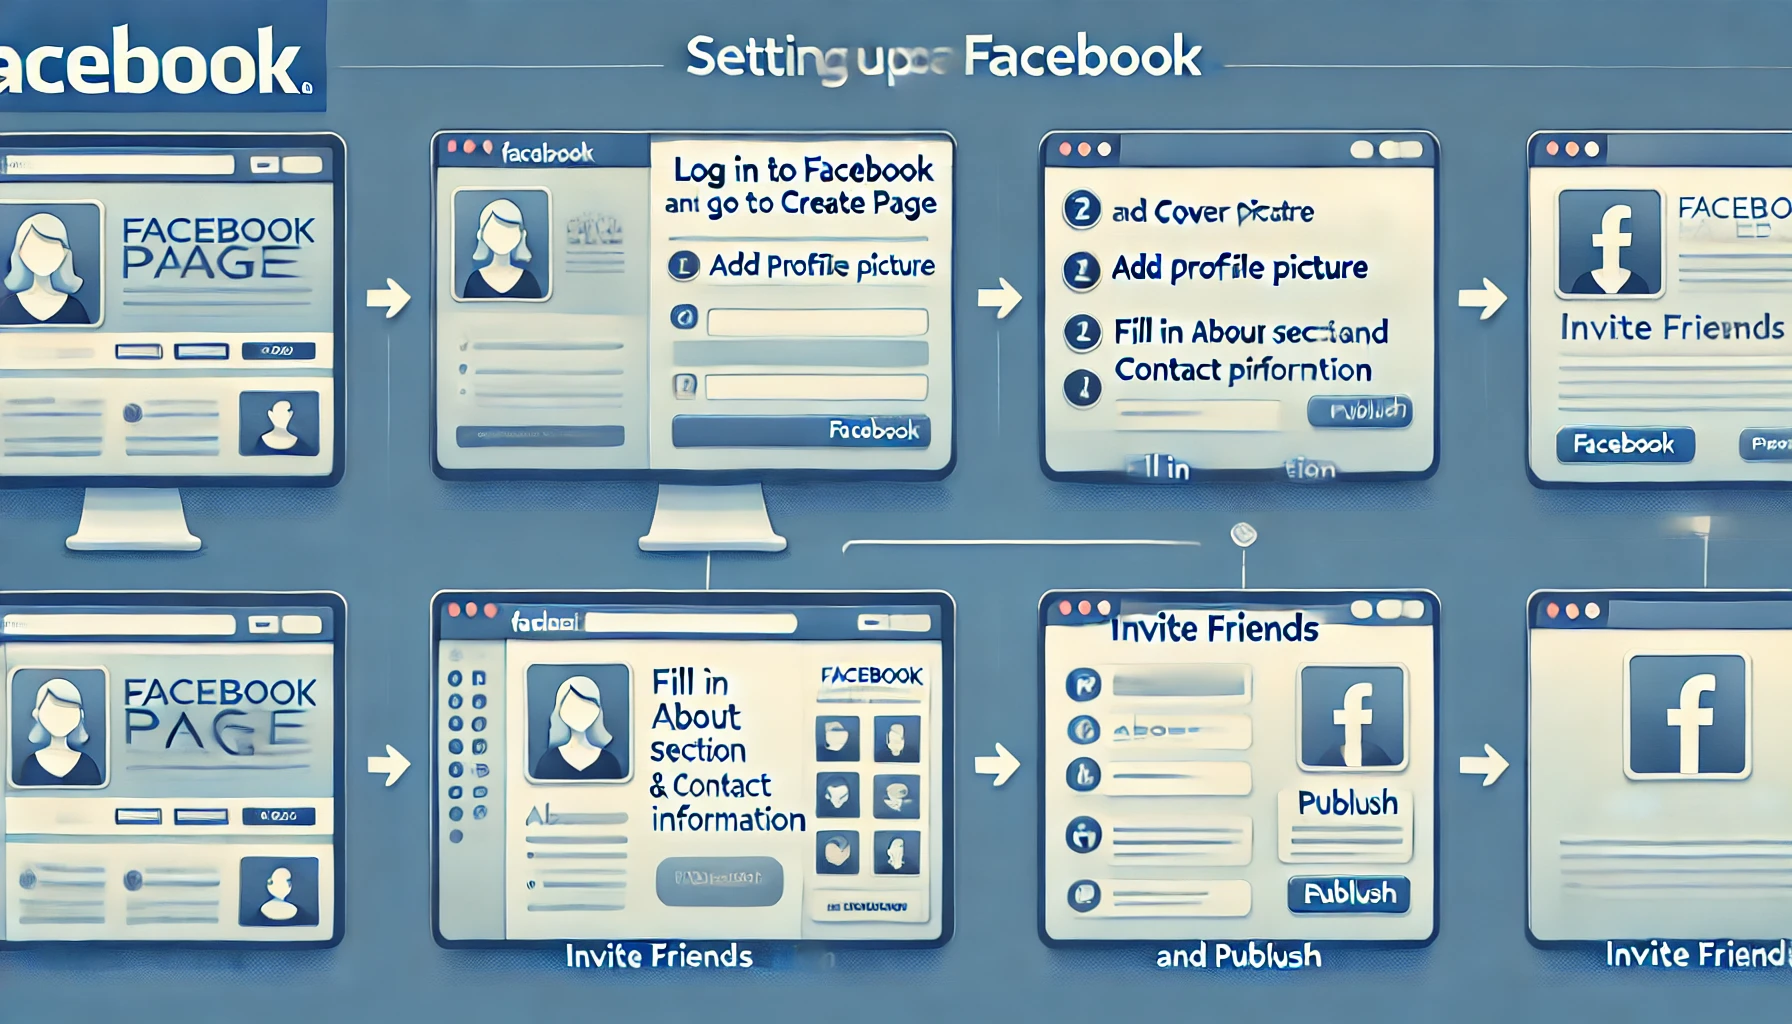
Step 1: Create a Facebook Account
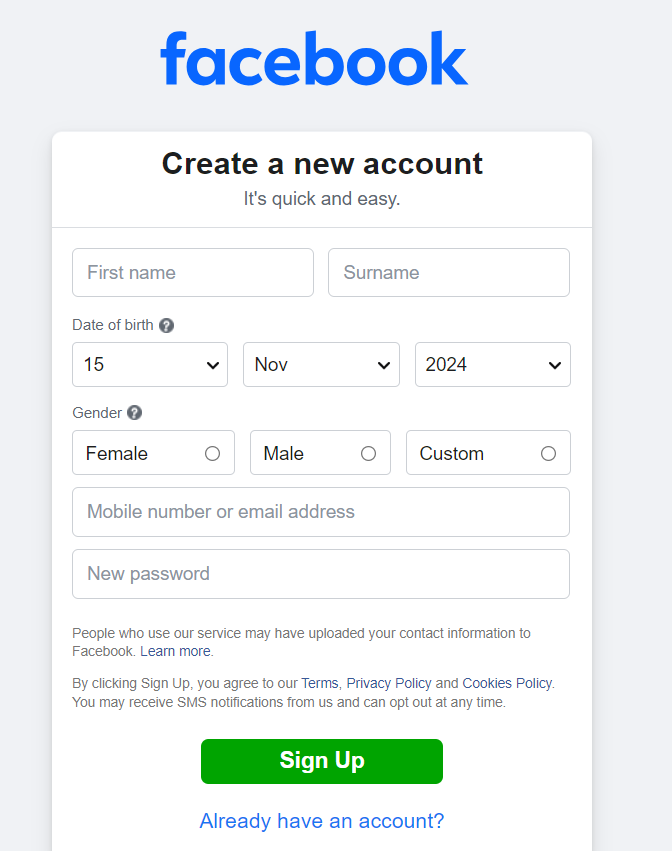
- Sign Up or Log In: Go to Facebook and create an account or log in if you already have one.
- Secure Your Account: Enable two-factor authentication to protect your account.
Step 2: Create a Facebook Page
1. Go to the ‘Create’ Section: On your Facebook homepage, select “Pages” from the left-hand menu.

2 . Click on ‘Create New Page’: This opens a form to create a new page.
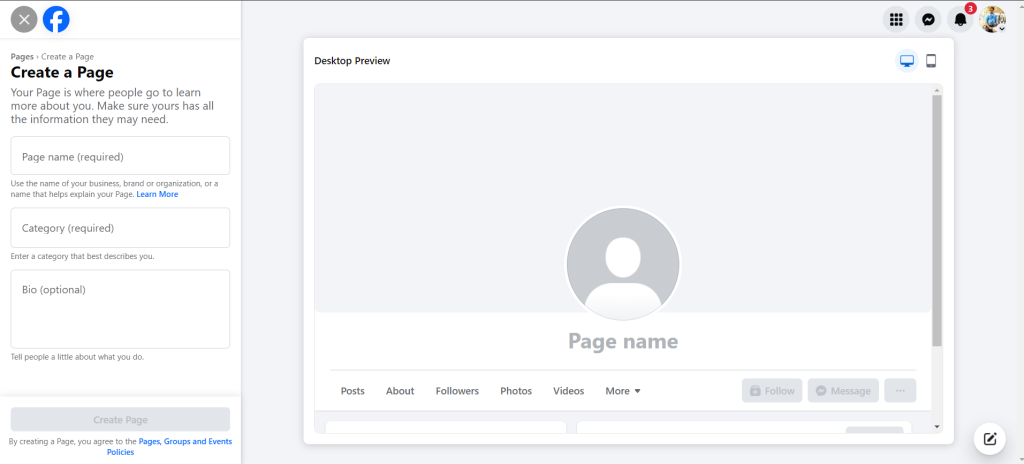
3. Enter Page Name: Choose a name that represents your business, brand, or public figure name.
4. Select a Category: Choose the category that best describes your page (e.g., Local Business, Brand, Product).
5. Add a Description: Write a brief description of your page to let people know what it’s about.
Step 3: Add Profile and Cover Photos

- Profile Photo: Click on the photo icon in the Profile section and upload an image that represents your brand (e.g., logo).
- Cover Photo: Click on the cover photo area and upload an image or banner that conveys your brand message. Optimal dimensions are 820×312 pixels for desktop and 640×360 pixels for mobile.
Step 4: Add Page Details
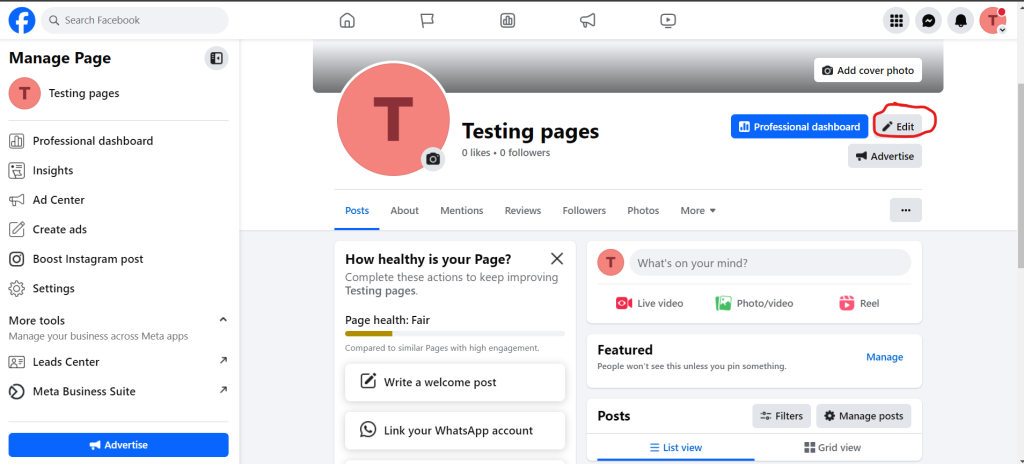
- Go to ‘Edit Page Info’: Access this from the left-hand side of your Page.
- Fill in Basic Information: Include details like contact information, location, business hours, and website URL.
- Add Additional Information: You can add details like your mission statement, team members, and any relevant company information.
Step 5: Create a Username for the Page
- Choose a Unique Username: This is the “@username” displayed on your page and helps people find it.
- Edit Username: In the Page Info section, click “Edit” next to the Username field, and enter a username that reflects your brand (e.g.,
@YourBusinessName).
Step 6: Set Up Page Roles and Permissions
1. Go to ‘Settings’: From your page, click on Settings in the top right corner.
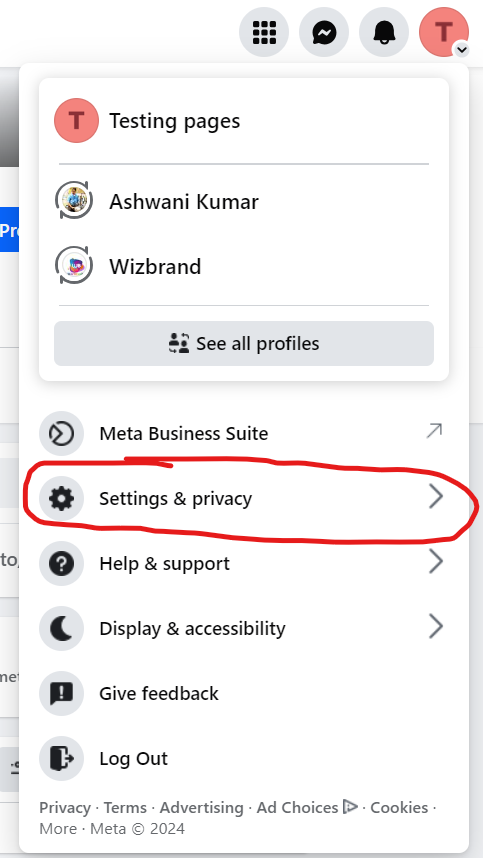

2. Select ‘Page Roles’: Assign different roles to team members, such as Admin, Editor, or Moderator. This allows others to help manage the page without giving them full control.


Step 7: Customize Call-to-Action Button
1. Choose a CTA Button: On your page, click the “Add Button” below your cover photo.

2. Select an Action: Choose the action that best suits your page (e.g., Contact Us, Shop Now, Call Now).
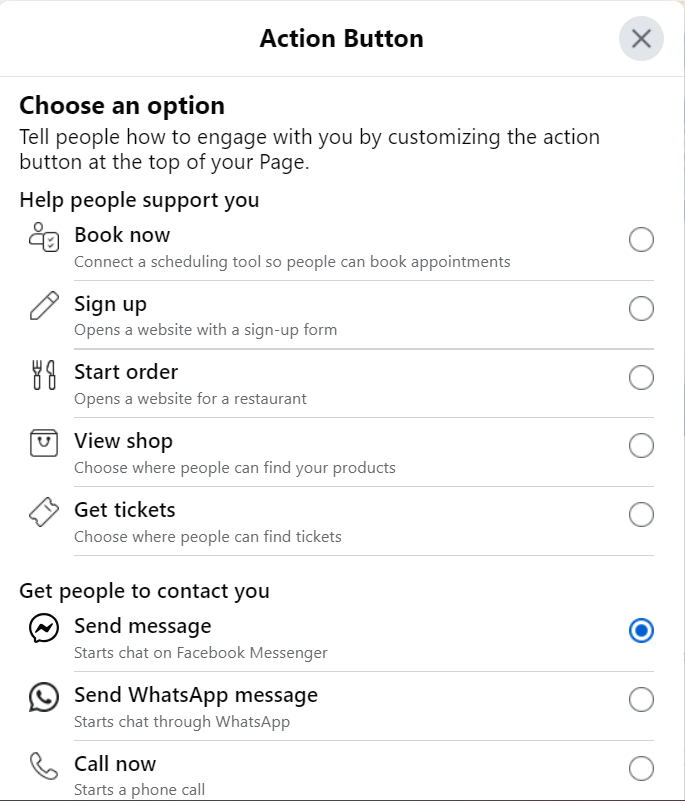
3. Customize the Action: Enter the relevant information, such as a link to your website or contact details.
Step 8: Add Tabs and Customize Layout

- Go to ‘Templates and Tabs’ in Settings: Here, you can choose the layout of your page and enable or disable tabs (such as About, Photos, and Reviews).
- Reorder or Add New Tabs: Organize the tabs to highlight the most important sections first.
Step 9: Verify Your Page (Optional)

- Go to ‘General’ Settings: If eligible, you’ll see an option to verify your page. This helps with credibility and search ranking.
- Follow Verification Steps: Facebook may ask you to provide a phone number or upload official documents to verify your business.
Step 10: Post Content and Engage with Your Audience
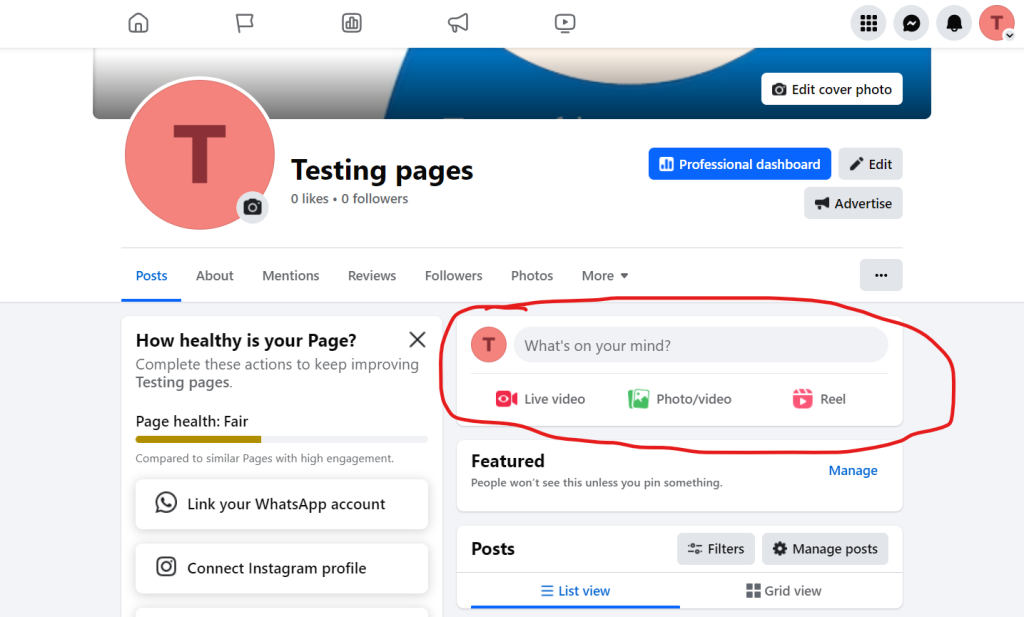
- Post High-Quality Content: Publish content that’s relevant to your audience, using images, videos, or live sessions to engage followers.
- Engage with Comments: Respond to comments, messages, and mentions to build a relationship with your audience.
Step 11: Monitor Page Insights
1. Go to ‘Insights’: From your page, navigate to “Insights” in the left menu to see metrics on engagement, reach, and audience demographics.
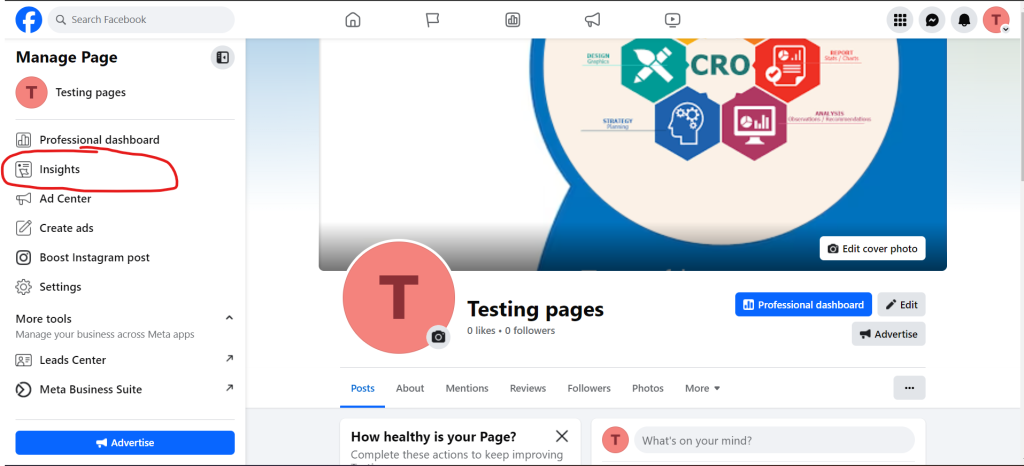
2. Analyze Data: Use this information to adjust your content and posting strategy for better performance.
