Want to Create a Facebook Group but Don’t Know Where to Start?
You’ve got a great idea for a community, but setting up a Facebook Group seems overwhelming. You want a space where like-minded people can connect, share, and engage, but how do you get it just right?
Don’t Let a Poorly Configured Group Turn Away Potential Members!
Picture this: You’ve set up a group, but it’s a ghost town. No one’s joining, and those who do, leave quickly because the group feels unorganized or inactive. It’s frustrating to see your vision fall flat because of a few simple setup mistakes. But it doesn’t have to be this way.
Follow These Steps to Configure Your Facebook Group Like a Pro
Let’s turn that idea into a thriving community! Here’s how to set up and configure your Facebook Group so it’s ready to grow and engage members.
Step 1: Create Your Facebook Group
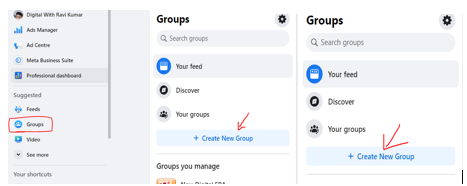
a. Get Started: On your Facebook homepage, click on Groups in the left-hand menu, then click Create New Group.
b. Name Your Group: Choose a name that reflects the purpose of the group. Make it catchy but informative.
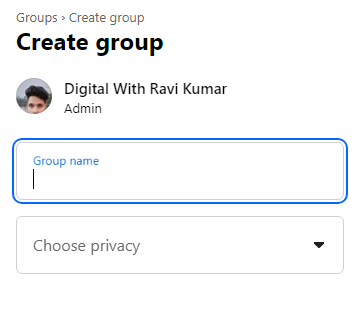
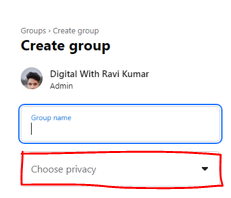
c. Choose Privacy Settings: Decide whether your group will be Public, Private (Visible), or Private (Hidden). Each option has different visibility and accessibility settings.
Step 2: Add a Cover Photo
a. Set the Tone: Upload a cover photo that represents the group’s theme or purpose. This visual element is the first thing potential members will see.
b. Recommended Size: For best results, use an image that’s 1640×856 pixels.
Step 3: Write a Clear Description
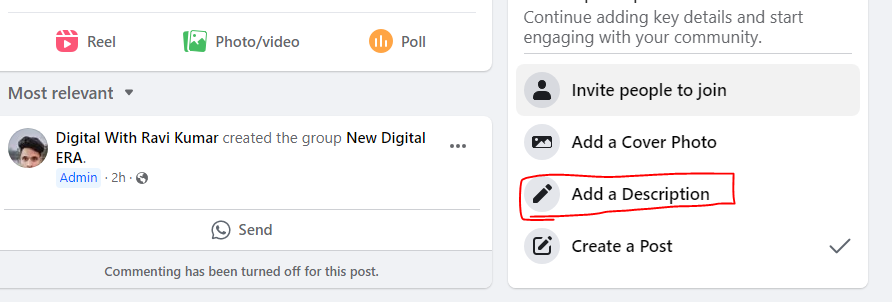
a. What’s Your Group About?: In the About section, write a compelling description that explains the group’s purpose, rules, and what members can expect.
b. Set Expectations: Clearly state the group’s focus and any guidelines members should follow. This helps set the tone and keeps the community on track.
Step 4: Customize Group Settings
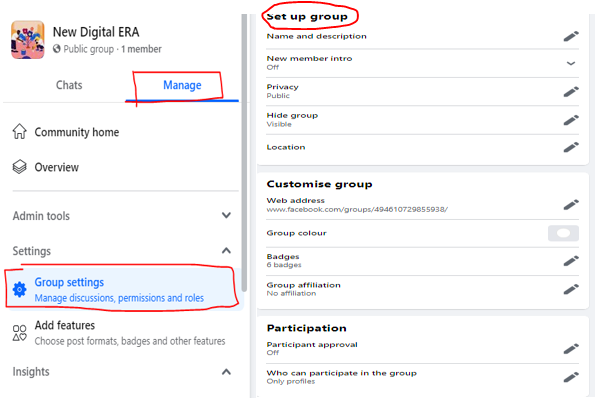
a. Edit Group Settings: Go to Settings to customize various options.
b. Group Type: Choose a type that best describes your group (e.g., Parenting, Buy and Sell, Support).
c. Tags: Add tags that make it easier for people to find your group.
d. Location: If your group is location-specific, add this detail.
e. Linked Pages: If you have a Facebook Page connected to your group, link it here.
f. Apps and Integrations: Set up apps or tools that will help you manage the group (like scheduling posts or automating moderation tasks).
Step 5: Set Up Membership Approval
a. Control Access: Decide how new members can join your group.
b. Membership Questions: Set up questions that applicants must answer before joining. This helps filter out spam and ensures that new members are a good fit.
c. Approval Requirements: Choose whether you or your admins will manually approve each new member.
Step 6: Create Group Rules
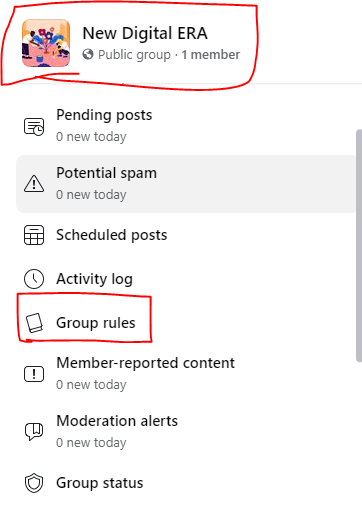
a. Establish Guidelines: In the Rules section, create a clear set of guidelines that all members must follow. This helps maintain a positive and respectful environment.
b. Pin the Rules: Make sure the rules are easily accessible by pinning them to the top of the group.
Step 7: Invite Members

a. Build Your Community: Start by inviting your friends, colleagues, or anyone who would benefit from the group. Share the group link on your other social media platforms or via email.
b. Encourage Engagement: Welcome new members and encourage them to introduce themselves or share their thoughts on the group’s topic.
Step 8: Schedule Posts

a. Keep the Group Active: Use the scheduling feature to plan regular posts. This keeps your group active and gives members a reason to check in regularly.
b. Mix-Up Content: Share a variety of content – discussions, polls, live videos, and events—to keep the group dynamic and engaging.
Step 9: Monitor and Moderate
a. Stay on Top of Activity: Regularly check in on the group to monitor discussions and address any issues. This helps keep the group healthy and active.
b. Assign Moderators: If the group grows large, consider adding trusted members as moderators to help manage posts and member behavior.
Step 10: Promote Your Group
a. Spread the Word: Use your Facebook Page, other social media platforms, or even Facebook Ads to promote your group and attract new members.
b. Collaborate with Others: Partner with similar groups or influencers who share your audience to cross-promote and grow your membership.
Conclusion
By following these steps, you’re setting your Facebook Group up for success. Now, it’s time to bring people together, spark conversations, and grow your community. Don’t start configuring your group today, and watch as it transforms into an active, engaged space where your members connect and thrive!
Thanks,
This guide was very helpful and easy to follow. I liked how it showed each step clearly so I knew what to do when setting up my own Facebook group. The tips about writing a clear description and inviting members made sense. I learned a few things I did not know before and I feel more confident now to grow a community that will be active and useful for everyone. Thank you for the detailed guide.